Search This Blog

Tuesday, November 16, 2010

Dose of Molten glass for the lampwork addict please

Yep, I have been getting increasingly DESPERATE to lay my hands on some glass rods and melt them down into thier new life. I have unpacked my garage to the point where I can now step into my workspace and touch the glass rods in thier holders .....YAY .... but still not quite good enough.

So, whats the easy solution you might ask? Well, I drove over to Bilgola to my friend Gails studio and Halleluja, we melted glass together for a few hours. It is really on just feeding the craving, but like any addict, I am sure a small hit is better than none at all. I taught Gail how to make some complex murrini cane (which she did very well at) and she let me use her humungous torch (a GTT Delta for the afficioniado's out there) to make my first unsupervised paperweight. The decision to try out the stumpsucker and make a paperweight was a quick one and so I made a very fast and dodgy-arsed setup which took me all of 15 min to make..... bit of a shame, but better than an empty paperweight, or one with just frit inside. I made a couple leaves, a gumblossom, some aussie flowers (a bottlebrush that resembled a toilet brush and some non-sneeze inducing wattle) and the main feature of a red backed spider with one leg missing - fortunately in the preheating stage we managed to partially melt another leg so he is not lop-sided.
Here is a pic of the offending article.... please shut your eyes to the haze, the smudging and the REALLY shitty shaping job I did. This was the first time that I had made a paperweight totally myself...... yep, I was a bit scared to be honest, but it was really fun (not getting it off the punty) and hopefully they can only get better!

Friday, November 12, 2010

House move from hell, still unpacking......aaarrgh

I have missed the boat to do more torching in the cool weather I think, but here is a particularly unflattering pic of me in the middle of my messy boghole of a lampworking desk just before the packing up began......................... artistic temperament = organised mess (at least that is what I told myself)

Yep the house move from hell is over, but the unpacking is feeling a bit like the neverending story or groundhog day..... box after box after box etc. I am sure you who have moved themselves totally understand the pain. We have somehow managed to get most of the house unpacked (apart from small pockets of boxes in corners), but the garage is a real disaster and my lampworking zone is a particularly nasty quagmire of boxes and miscellaneous "stuff". I reckon I either need to lose about 60kg or not fit between the boxes to even reach my glass.... well to be honest the 60kg could come off irrespective of that issue, but we had better not go there :-)

Now that the rain is giving it a short rest here in Western Sydney I thought I might get some of this rubbish out of my space. I am getting increasingly desperate to set up my torches and kiln and melt some glass. My dreams of sorting out the stuff as I unpack and start working in a pristine well organised environment is very quickly being given the bums rush so that I can just get some lampworking done................ If I wouldn't set alight to the cardboard boxes and melt the plastic ones I might already have lit the flame.......... hey, thats one way to sort out the garage ;-)

Tuesday, October 26, 2010

Collabaration - different glass, another butterfly

Hmmmm, a great friend of mine Gail is very VERY talented at fusing and slumping and we are thinking of forming a team and collaborating to make some really interesting glassy things. I will still of course be sticking to beads and murrini as my core business, but the idea of making some larger and more unusual glass bits and pieces really sounds fabulous to me.

At the moment we need some planning time to get all our ideas down and form some sort of a priority listing so we have some goals rather than just run about ooooohing and aaaahing about our combined wisdom and mad schemes (we are both a bit the same, the crazier the better and we feed off each others enthusiasm)

My part of the "collab" will involve me making some complex murrini and small componentry in 96coe which should be compatible with the glass sheet Gail uses and to be honest a lot of the real skill will most likely be how she does her end. Thus far my only slumping efforts have been restricted to some bottles to make platters and "cabifying" dodgy beads (melting a cleaned up bead into a cabochon). In the week leading up to the move and sticking with my comfort zone I made quite a nice orange butterfly cane which I left as a graduated large diameter rod so that different sized slices can be cut..... all larger for the larger project, but some variety of size. Here's the pic of a rough slice of the finished cane. The great thing is that if I saw up the scrappy ends we will end up with some really cool fusing slices (half and quarter wings etc.).

Interestingly enough, I found it quite difficult not to pull down some of the cane for bead-sized butterflies..... Just habit I am sure!

Now..... I MUST go sort out some of my lampworking garage space and search further for beads.......aaaaaarrrrrrgggh!

Monday, October 25, 2010

House move from hell.... where are my beads gone!

Yup, my house is a little bit like a black pit of "stuff". We have been moving house over the last two weeks and now live in a massive pile of unpacked boxes! Moving from a humungous house to a smaller one has come with a large number of trials too......... WHERE ARE MY BEADS is the plaintiff cry heard more than once over the last few days!

My darling hubby Leo has tried to be very cognisant (big word for the day there friends) of the fact that I need a usable & safe space for my lampworking with adequate ventillation and no fire hazards. All this combined with limited space and trying to plan for correct storage of my rather large stash of lampworking glass is turning out to be a bit of a nightmare. I would take a picture of the carnage, but can't find my camera..... yup, packed!

I tried to limit the difficulties by leaving my lampwork setup and beading supplies until the very last, which I thought would be a "brilliant" plan so I could access my stuff quickly at this end...... no dice! I got a rather bad headache on the last moving day and had to leave it my Leo, he has managed to shove my stuff into boxes and plastic containers which are now spread all over the place - totally not his fault, I would rather have my things than leave them behind, but now I am needing some of my beading supplies and are getting rather desperate to melt some glass again I am getting slowly crankier by the day...

....hmmmmm, unpack kitchen stuff so we can have a home cooked dinner, or live off takeaway another day and continue the search for beading supplies................................... BEADING WINS!!!!!!!

Oh, here's one of the last beads off my torch before the move - I call her a Burlesque bead (think goddess with clothes!) This lady has gone to a lovely lampwork friend Trinar ;-)

Friday, September 10, 2010

Half a dragonfly and its looking good so far!

Yay, I checked the kiln first thing this morning and couldn't wait to saw the rough ends off my half dragonfly cane..... what a charming way to wake the kids at 6.30am I was thinking!!!!!

Here is a pic of the two dodgy ends of the half cane I cut. Seeing as the lobes are transparent they are quite difficult to photograph unless you are looking up into the sky with some light behind. This morning is really foggy here which has been very handy, sort of like a natural version of a light tent! Anyway, as you can see I opted for a very fine thin tail with the thicker body and head. The gather was quite large before I pulled and I really struggled on my Minor torch to get the heat built up enough to pull, therefore there was a bit of distortion and the side that was supposed to be flat.... isnt! I may yet have some tears and swearing trying to get the two sides together neatly, but sometimes it just sorts itself out in the wash. One trick is to heat the first side quite a bit (making sure it is the more circular one) and pressing lightly on the marver to re-flatten the side prior to applying the second part. I will use the right side cane in this photo first and re-flatten it so it should fit together a bit better - will see!

I reckon that I will try to heat the tail end after the two pieces are together and bend it a bit to one side then refill the hole with clear. I think it will look more natural and way cuter to do it that way, but it will depend on how soft the clear is, I don't want a tiny hook on the end instead!
I am finding that increasingly I am listening to what Loren Stump told me and are leaving the final cane really thick. I am just slicing off a piece when I want one and pulling down to bead sized when I want and the good thing is that as a result I am now building up rather a nice stash of complex murrini canes in a more compact form rather than loads of long skinny rods.
I thought I might try another experiment with some of the large slices too. Once tumble polished I have some sheet 104 glass and I am going to try to fuse a slice onto that for a pendant.... might be interesting at any rate. Hopefully I won't end up with a marble on a plinth like I did once before when trying to fuse some tiny murrini onto scrap glass.....doh!

Thursday, September 9, 2010

Hmmmm, maybe its time for something other than a butterfly..

Yep, I have not been butterflied out yet...... but getting there. I finished up a pink/white butterfly today and if I can get some decent sun I will get a pic and pop it up. To be honest the combination of white and pink is a bit wishy washy. I think it needs a dark colour around the lobes to differentiate them somewhat and also reckon that the wings would look better with something quite dark at the edges.... lesson learnt! I have drawn myself up a line drawing butterfly on MS Paint which I can use as a way to plan some colour combo's using coloured pencils before taking the plunge in glass. I think it might help rather than just trying random things and then being a little dissapointed.

My next project (that I am half way through) is to make.....da dada da ..... a Dragonfly. Yeah I know that anyone reading this is probably groaning to themselves, but I have approached it quite differently to the butterfly in some respects. I decided to make three slightly different graduated lobes in transparent blue, each lighter than the previous one with a black thincoat on the outside. The plan was to have the darker lobes closer to the body of the dragonfly and use the lighter ones on the outside, pop a little bit of clear in as a filler then more black thincoat around the outside to give a sort of delicate graduated blue veined effect of a delicate dragonfly's wing. Here is a pic of the plan (which I had to be very careful to pick up the right coloured lobe in correct order) and a bit of the bodgy end slice so you can see how it has gone thus far.

I have cut the good part of the cane into two segments which I will put together tonight into one side of the dragonfly. I am still thinking of how to approach the thinner tail end of the body and are inclined to leave the clear surround a bit thinner, so that I can put a slight twist in the tail when I construct the final two peices together and then fill with clear to make round...... hmmmm, still got the brain matter working on that one!

Tuesday, September 7, 2010

Half is better than none!

Well after the disaster yesterday morning with the butterfly murrini wing, in a fit of stubborn bloody-mindedness I went back for round two last night (about 10pm) . I sawed the remaining wing in half to give me two sides once again, ramped it up slowly and made my white/green butterfly. I got to bed about 2am but felt a bit less cranky about the whole thing. Its extremely irritating that I have ended up with half of the volume of cane, but that is much better than none at all....... I will admit the need to repeat this to myself each time I look at the cane! I also had to pull it rather smaller diameter than I would have liked because of the small volume at 1.5cm, but they will still be quite usable.


I have chopped the cane in half and thought I would slice one half up into slices to tumble to application to beads and leave the other little bit for pulling into small bead sized diameter later if I feel like it.


Next project: a Pink/purple and white butterfly with some playing about with edge colouring etc. and to stop being a wuss about starting the face of my complex fish murrini. The scales and the eye is done, but I keep putting it off.... just don't want to ruin the work so far I think!

Monday, September 6, 2010

White butterfly disaster has struck!!!!!!!!

Hmmm, well I had better come clean on here when things go.....er...... astray too!

I have been thinking about the butterfly murrini and colours and stuff and thought that I would make a white butterfly with green lobes.... hopefully it won't look like a moth dressed up as a butterfly, but it would be worth a play around at any rate.

I made the graduated green lobes which was fine and they came out really nicely. I dedided that I would put yellow surrounded by some clear for the small dots on the wings to try and make it sort of "delicate" and that turned out quite well. I made a couple blue/green dots for some extra oomph and they came out ok..... see for yourselves, this pic taken this morning just before attempting to put together for the final pull!

Being lazy and yet, in a bit of a hurry, I decided to ramp my kiln up very quickly and to avoid some crack-a-lacking when introduced into the flame put it on 560C. Well, rather than let the components soak somewhat at this temp I just couldn't wait and as soon as it it the top temp I got my first part out......... Crack time.... yep, huge big splitting nearly in half nasty cracks with bits falling off and completely ruining one half of my cane. Needless to say I was grateful for the kids all being at school, because there was some nasty swearing (even the FG one - F#@ Glass).
Once I had killed most of that side of the butterfly I was then left thinking..... what the hell do I do now? I decided to pop it back into the kiln and see if there is some decent slices to be had off the cane for fusing or polishing and left the other intact cane in there and put the lot back through a long annealling cycle. I am going to cut the one good half in half again and try putting those together in a more measured and careful manner.
Remember folks..... the murrini never forgives and is a card holding member of the Murphy's Law of cocking up!!!!!
NOT HAPPY!!!!!!

Tuesday, August 31, 2010

Tumbling on..and on.......and on a bit more!

I thought I would update on the progress of my tumble polishing experiment. You might remember that I was flat-lap impaired (a flat lap is a flat polishing machine that uses a largish rotating disc and you polish down against it) and decided to use some of the equipment on hand - specifically, my handy dandy you beauty rock tumbler!!!


First off I put some rough sliced discs of glass murrini into the tumbler with some 80 grit which is quite rough and really ground down the edges nicely over about seven days of tumbling. One thing to note is that rather than using the little plastic bead tumbling medium I used some home-made heavy leather offcuts my dad had cut up for me and it worked a real treat and was far better for tumbling the glass with. I then moved across to some 120 grit and after about four days moved across to 250grit which is quite fine and used for pre-polishing. Now I have bunged the first lot into the cerium polish and hopefully that will finish them off to a high polish and I can use them as they are for making some jewellery using PMC or can preheat in the kiln and insert them into a lampwork piece without having to worry about a huge volume of scum caused by a rough surface.

Here is a pic of a couple pieces just before I put them into the cerium for polishing. I am a bit worried about how the polishing will go as I am told that Cerium really needs friction and warmth to work properly. If the tumble polishing doesn't work I have bought myself a set of polishing bits for my dremel and will do some by hand..... may have to try that just to see the difference anyway ;-)

Wednesday, August 25, 2010

Glasschallenge entry & boro love

Hmmmmm, well here I am back again! I thought I should take a small break from bending your ears about making murrini again (even though I am half way through making some boro butterflies :-) and tell you about my latest project continuing on from the glass chain on the post below.

The glass chain came about when I was trying to think of something new and different for the Glasschallenge sponsored this time by Mountain Glass Arts in the US. I decided that I wanted to make something out of boro given that I am booked to do a course with Alan Usher a talented local artist here In Australia in September and hadn't touched my boro stash for a while! After I made the glass chain I kept looking at it and in my usual way tried to think of ways to apply murrini to it..... I considered:
Sticking murrini to the links randomly, Make separate connectors for each link with a murrini in each one, encase murrini into the glass rods before making into the links, dangle a murrini off a hanging bar on one side of each link or......voila! Make a barbell shape with murrini in the ends at the right diameter that it moved around but cannot come off the chain!
Here is the result. My first try was using some home made silver glass boro murrini I had made a while ago and it turned out great. It was a reasonably difficult job juggling the weight of the chain and the barbells whilst using a cold attached punti to insert each barbell before making the second large end and also manage to avoid reflected heat onto the previously worked and cooled links etc.

I ended up spending about two days on each of these necklaces. The blue one I did first and then thought I would tart up the amber chain with some momka sunflower cane used as murrini. Here's a bit of a closeup. They have a lot of movement and make a lovely "tinkle" when you wear them, but they are a trifle heavy!

Saturday, August 21, 2010

Chain me to my torch please!

Well, first off, for those who are following my murrini making adventures, I have made some orange/yellow monarch butterfly murrini which (as I was warned) do have a bit of a tendency to crack. I have got a pic of the two halves just before I put them together and it worked rather well, but unless I pull it into fairly small diameter it is to be honest a bit of a poop for developing fine cracks inside the cane..... bloody yellows!!!!


I also thought I might go the whole hog and use yellow to make some fish scale murrini. First I made the single scale which I cut into 4 and put them together (a bit like a jigsaw) and then I pulled that cane and cut it into 4 until I now have 16 scales in a cane ready to be constructed into a complex fish. I have made some really cool fin material, but haven't done the face yet so I will have to get my finger out this week and get that face done. I am going to try to do a 3D pull on it, but are not attempting a real fish pattern or anything. Here's the pic just before the last pull, it turned out fabbo!


My rock tumbler is still going strong, I have found that if I throw my rough sawn glass discs into the barrel with some cut up leather they work really well. I have finished the 80 grit cycle which took about a week and very nicely rounded off the edges, but took a bit of work to grind the flat sides of the big discs...... I am sure that is just pure physics, but interesting at any rate as it signifcantly prolonged the tumbling time and if you had murrini without clear around the edge you could be in trouble if the pattern went right to the edge. I have my 160 grit out and moved most of the glass across to that barrel (thank goodness I have two barrelled tumbler.... thanks Lortone). I am going to slice up some more and sort of cycle the glass through my four barrels finishing off with the Cerium Oxide for really give me some shine.... I hope so!!!!


Here's my latest experiment. I have seen loads of different types of lampwork chain on the net (mostly in the US) and thought I might give it a try out. Here is my very first effort using some boro (because it is so forgiving at being reintroduced to the heat etc.) It is not as easy as it looks as a matter of fact - trying to keep the links small, neat and "round" was quite the challenge.......I cheated by using a large piece of stainless pipe and wrapped them around that to give me the base size and half of the shape and it made life a hell of a lot easier. I had some fun working out how I would make my clasp out of the glass and settled for a hook at one end. I am currently working on some glass chain with "extra stuff" that I am thinking might be good and unique for some gallery work I have been asked about! It of course involves chain and murrini!!!!


Thursday, August 12, 2010

Out of the kiln, through the saw and voila..... murrini!

I am so pleased to say that my final murrini pull on a couple of my recent sojourn's into the complex murrini world came out of the kiln this arvo....... thank the murrini gods (most likely Loren Stump) THEY WORKED!!!!! (insert lots of jumping about in relief here).


The butterfly cane is a graduated pink one (although the pic is a bit crappy) and one thing I was a bit annoyed about is the scummy clear. I know that if I want a perfect butterfly in crystal clear then I have to peel the rods but I just couldn't face all that peeling!!!!! I sawed up some slices and have them in the tumbler as we speak - I was going to have the tumbler going over the last few days, but if you don't fill it enough the contents just swoosh around one side..... now it is "fully loaded" and off and running. I hope it doesn't take as long as rocks do to smooth off though!!!

After my rather boxy attempt at a complex leaf cane I am very pleased with the second attempt sawn this arvo. I decided that I would serrate the leaves on this one and I think they look a bit more realistic that way (but a wee bit of a poop to heat prior to pulling to keep the serrations actually there) I am particularly happy with this cane, because even though Loren gave us the basics, I have done the veins in this way which was my own idea - I am hoping he would be proud of me! I was very happy with the graduated transparent green moving to the darker side in the middle of the leaf and using the Grass green opaque was a nicer colour effect too I reckon. I have sliced some leaves up and have got them in the tumbler as well, but thought I might slice some really thin ones and some of the dodgy ends of the pull, preheat in the kiln and try applying to the outside of a soft glass marble..... there's not much point in making all these murrini if I am not going to use the buggers!!!

Tuesday, August 10, 2010

Mama's got her new lapidary blade and she working it!

Back again so soon and EXCITED! I actually got some more use out of the wet tile saw this morning and I am very happy with the results! I left the evidence on the tray so you can all see I did use it.....
First off, I had all sorts of strife getting the arbor size right on this thing, Leo bought me a lovely new saw for my birthday which I then rudely took it back and swapped believing the info on the internet that the Ryobi one had a 5/8" arbor which would nicely fit the most common sized lapidary blade (arbor is that hole in the middle of the blade)...... nope, it did NOT!!! Unfortunately Bunnings only stocks saws that have 7/8" (or 22.2mm) arbors so then I had to find a solution - I did not want to take this saw back as well it was driving me NUTS! Fortunately for me after some hunting about I found a lapidary supply place that had 1" arbor with a bush to suit the 22.2mm in 7" actually made to suit wet tile saws....... and the love story begins!!!

Knowing that I was sorting out the saw situation I started making myself some murrini components over the past few days and here they are all sawed up and ready to use. I finished the top half of a butterfly's wing last night (out of the kiln this morn) and made the leaf cane which is mostly graduated transparent green with opaque pistachio coloured veining yesterday too. The fish scale cane I made last week and I am really keen to try putting them together like Loren Stump does his fish scale cane..... hopefully I won't bugger it up!


I have been giving some thought to how I will be able to deal with the polishing issue and think I might have a plan of action - its not perfect, but hopefully it will work with some patience. I am going to slice up quite a lot of the large cane slices and pop them into my old rock tumbler with loads of little bits of cut up leather (a trick my Dad taught me when we into fossicking and tumbling our stones) starting with a medium grit and moving to fine at which time I will use my dremel with a polishing pad attachment and some cerium to finish off. The only big pain in the arse is the wait for the tumbler, but I reckon because it is glass and not rocks it will not take weeks, maybe just a day or two for each step. The added advantage of this option is that even the edges will come out lovely and smooth and polished too which makes using them even more fun. Here's is my old Lortone rock tumbler (double barrelled!) hunted out of the back of the shed by my darling Leo again - I will have to give it a clean up, but then I will load er up today and I will see how we fare. I thought I had better make the slices on the thicker side rather than the really thin ones seeing as they will be bumping together somewhat!

What am I going to do with these polished slices you might ask? I am thinking that if I preheat them I can apply them to the surface of a bead or pendant, I could drill a small hole in the top and use that to hang off some chain or earrings or even ask a friendly silversmith to bezel them up with a bail for a pendant on a necklace....... it will be interesting to see where this takes me!

Monday, August 9, 2010

Here's the paperweight!!!

I thought I might as well load up a pic of the paperweight I made on my Loren Stump level 2 course.
First off we made the butterfly murrini by choosing the colours we liked and making the lobes which are then constructed into the top and bottom wing. Here's a pic of the half a butterfly slice before I put the two halves together. I have to admit that mine was a bit dodgy compared to some of the gorgeous work which was partly because I had made my lobes too fat and then had to squish them a lot which distorted the ends of the coloured lobes. I also managed to pull my murrini a bit smaller than I should have in the final pull and therefore ended up with a fairly small butterfly. Good thing is that I have another set of halves ready to put together and pull again if I want. I have also come home and practiced a little and have made myself the top wing tonight and will do the bottom wing tomorrow then put together and see how we go.
I am LOVING the saw n0w I have my new lapidary blade set up and it is making the complex murrini making a real joy. I am going to break out the tumbler with some small bits of leather to try polishing the slices in there seeing as I don't have a flat-lap and don't really want to go to the expense of getting one in the near future.
I made myself a complex leaf cane which I have left at a reasonably large diameter today which is sitting in the kiln as I type....hhhmmmm, I am thinking slicing polishing then drilling a top hole and installing on a necklace should be fairly cool - very time consuming, but cool nonetheless!

Wednesday, August 4, 2010

Post Loren Stump course Murrini Frenzy begins!

Well, for those in know I was at a level 2 Loren Stump glassworking course down in Adelaide last month quickly followed by being a Technical Assistant for his Level 1 course in Sydney...... what a blast.

For those plebs who have never heard of Loren Stump, he is (to put it plainly) a great big whopping glass legend!!! Loren does absolutely amazing things with glass that everyone had agreed were impossible. Loren's murrini skillz are out of this world, when I say I am praying to the murrini gods.... well that is actually Loren I am talking about. He has even replicated great works of art into tiny glassy slices that are mindblowing. Loren is a top bloke and rather down to earth - almost on the bogan side really, but he is a fabulous teacher who holds nothing back at all!

Last year I did the level one course and came back to a real funk, it seemed that now I had been educated in what to aim for, everything I had made earlier was fairly crappy to my own eyes and I really avoided melting glass in the fear that more crap was going to be produced. Eventually I did get myself out of this funk, but have been determined not to give into the mind games with myself this time and therefore have gone out and melted glass already!

Leo (beaut husband of mine) got me a wet saw for my birthday and this definitely opens up loads of new opportunities as far as my murrini making goes. Being able to work using larger diameter componentry will make life much easier and whilst waiting for my new lapidary blade to arrive I have been making component cane for butterfly (lobes of the wings in graduated colour) and fish (graduated scales).

When I get my blade and do some slicing and dicing I will be back to show some of it off!

In meantime, keep your torches hot!

Nat

ps. new logo for the business!!

Tuesday, July 6, 2010

Making haste.....slowly!


Geeze, I know I have been really slack on my blog lately. I think it is a combination of feeling guilty over taking so long to finish my murrini collection and also (strangely enough) for not blogging for so long. Its a weird thing guilt! Sometimes I get so caught up in life that I can't even melt some glass and torch myself into my own glassy universe. My "Glassverse" is where I work to create a thing in my hands that is at least representative of what I picture it in my head. I must admit that as my lampworking / flameworking skills improve, I am feeling slightly less frustration with the deficit between my vision of my art and the end product...Well most of the time ;-)


I am about to ramp it up to a new level and head off to Loren Stump level II next weekend......aaaarrgh! He is a BRILLIANT teacher, but once again I will be taking a course where I am the least experienced person there and voted most likely to bugger stuff up. I suppose I need to keep my mind firmly fixed on the fact that my journey starts from where I am now and not a comparison with someone elses artistic journey. Last time I went to Loren's course I almost went into a depression of sorts where everything I had made previous to the training was crappy, I could see nothing but the faults and now that I knew better, glass works that had been my pride and joy were now a collection of errors and techical faults I couldn't see past. Its funny, but it took quite a while to drag myself out of the doldrums artistically and yet I could not wait to light up the torch when I got home........ I just sat and stared at the flame, my mind an empty vessel at the time and I walked away many times before I felt brave enough to dip in the toe and actually make something.

This time I am determined to bypass all the self absorbed perfectionism and work through it so I can recover the joy in producing the glass art I love as soon as I return....... hmm, might take some seriously good chocolate to guarantee that though!

Enough philosophising..... I have been making loads of little phone charms lately as a use for all those tiny experimental beads that were testing new colours or reactions of colours. I have been selling them via my Mum for $5 each and I am quite happy with that. She has been selling heaps of them to friends and family, next I will have to pay her a commission I suppose - but she has always been happy to support me in this way. I really am a lucky lady when I look at the big picture!

Tuesday, May 4, 2010

A Secret Glassy Mission

Yep, I am a girl on a mission..... a secret glassy mission! Sorry I have been a MIA lately!

The lovely Kerri from Affordable Inspiration has asked me if I was interested in a business proposition............ it would involve glass............. my answer..... HELL YES!!!!!!

Just in case anyone has their interested piqued... here's a hint:

I am also in the midst of writing a tutorial on how to use murrini, not just these ones that melt into the middle, but using the complex picture ones and the feather ones too!

It'll be interesting to see how I go!

My names of my "products" will all be based on "songs". I have Rainbow Connection, Blue Suede Shoes, Yellow Polka Dot Bikini, Purple People Eater, Lady in Red, Green Tambourine, Silvery Rain & Pink Cadillac to name but a few!

Saturday, April 17, 2010

Lets hear your tiger ROAR!!!

Well in between sick kids, sick husband and being crook myself I have been a bit slack on the lampwork front lately but one thing I have knuckled down and finished this morning was .....da dada da...... my tiger murrini!!!!

I started with the eyecanes which I had to resist from making them blue-eyed... I have a "thing" for making eye canes blue, I have no idea why really, but I do! I ended up using a thin ring of opal yellow with CIM Ghee around as the coloured bit of the eye. I had totally forgotten about making the shape flat on the top at first and to try and fix it I simply heated the top of the cane (a lot) then squished it flatbefore filling in with the white around the outside. Thank goodness it worked out fine, though not as good as I wanted it to be!

Once I had made the eyecanes and the mouth area as planned I didn't realise that I had forgot to make the ear canes..... until I was halfway though constructing the murrini - don't you hate it when that happens!

I started by preheating two sets of mouth and eye canes (one set as a backup) to about 580deg C which means than when it is reintroduced to the glass it will not shatter! Normally I only go to 560deg but given that the canes are all sitting right next to my bead door at the bottom of the kiln I thought I would go up a little higher this time (for which I was grateful because the first mouth cane shattered into little bits but the second one survived). I worked this murrini from the mouth upwards and outwards, adding stripes and colour and building up to the cheek area before applying the eye canes, then finishing off the head until I liked the shape. I was fairly upset with myself when I realised I had forgot the ears, so I just made some up on the fly.... they worked ok I suppose. I then encases the head with clear between the ears and around to the sides, but left the neck unencased so that I can attach the murrini to a tigers body without causing difficulties. I also left one section of the pull really thick (about 1.5cm diameter) and kept it in the kiln to anneal and I want to use this bit to be cut on a a trimming saw, polish the slice then apply to a tigers head Loren Stump style (may be a bit too much for me... but you gotta try these things don't you!)

Onwards and upwards, this murrini is NOT perfect, but hopefully will be quite cute and recognisable as a tiger when applied to a bead at any rate!

Sunday, April 11, 2010

Birth of a complex murrini idea - bring on the tiger


For anyone who is even vaguely interested, this is how I plan my complex murrini.

I start off with an idea of an animal or object. I then ask myself "how will this apply to a bead and how can it be used". I need to consider if I will make a murrini that is complete unto itself (a complete picture like a swimming frog) or it is something like my monkey face murrini which I can apply then add a body. Some murrini like feather murrini are applied, left raised then raked with a thin stringer of glass. Others are designed to apply but leave raised then heated so that the sides pull in to form flower-like designs.
Once I know how I want my murrini to be used, then I do some research. I have a look at the real-life animal pictures and if possible/available any cartoon style pictures too. I usually print off a picture that really shows the colours and shapes, then do a pencil drawing of roughly what I want to produce. Once I have a look at the drawing I then break it down into some component parts to make individual canes (eg. eyes, nose, legs, body etc.)
I usually start with the eyes as my first point, I find that they sort of set the feel of the whole murrini when constructing later.
My latest plan is to make a tigers face. I reckon the good think about a tigers face is you can have it peeping out of the grassy savannah, can make a cool stripy body and put the head on. I will make sure that I leave a good sized piece of fairly thick cane, should I decide later to build a body and apply the head too - but in the meantime I will pull some smaller cane to use on beads (which require fairly small diameter slices, but not miniscule).
Tomorrow I will at least do the eye cane and maybe the ear canes. This tiger murrini will probably take a LOT of work but I will update as I go!

Death of a cocky, birth of a flamingo!

Well after applying myself to making some lovely pink feather murrini (and some white with yellow for sulfur crested cockatoo's I will use later) I spent quite a lot of time making a very busy and quite large Pink Major Mitchell cockatoo bead......... it broke!!!! I think it was a combination of working a bit too large, being obsessed with the small details and not keeping the whole thing evenly warm..... and using one of my old mandrels that had the cheap crappy bead release on it (kept for making spacers ONLY).
After feeling "in my waters" that there could be issues with the cockatoo, one of which was just too much detail and very busy looking even before it went into the kiln, I thought I might make something else that required pink feathers........ a flamingo! I really slapped this one together, but yet, the kiln gods were pleased and this is what came out!!!!

Saturday, April 10, 2010

Parrot prototype using rainbow feather murrini

Now, whilst I was in my recent murrini-fest obsession (still not out of it to be honest) I was going to make a parrot head murrini. I have in fact made parrot murrini before, early on in my murrini making career (if you can call it that) and after the gorgeous Jan Cahill showed me a beautiful bead made by the VERY talented Kim Fields I wanted to make myself a parrot bead in the Kim Fields style too. Sooooo..... rather than invest loads of time in making a parrot head (which would look rather two dimensional on a 3D parrot) I made some rainbow feather murrini which is fast and easy to make!

I had to force myself not to look again at the bead Jan showed, I did NOT want to copy in any way, but only use the memory of the bead for inspiration and this is what I came up with (and got out the kiln this morning).I am quite pleased with the look of the bead, but feel that I can make VAST improvement on the placement of the green feathers and the colour of the rest of the parrot. You can see the rainbow feathers on the back look quite good, but I am also thinking that I need to make some feather murrini with different colour combos to more accurately imitate real life parrot colours! I do think the murrini would have looked better with the Pea Green as the end colour and therefore show more of that colour which would blend better with the rest of the green feathers!
Oh well, live and learn. I am thinking that I might try to make some pink graduated feathers and apply myself to making a Major Mitchell pink cockatoo! I was also thinking that some pink feathers would look good on my mate's (Maxine - glass by girlfriday) Pink Flamingo's.

Thursday, April 8, 2010

Bravery Beads program by Cure Our Kids

Well, I have been particularly slack of late and feeling commensurately guilty about not sending in some of the beads I have made for Cure Our Kids Bravery Bead Program. Here's the latest bundle to send off . http://www.cureourkids.com.au/bravery-beads.php.


Bravery Beads is very similar to the Beads of Courage run in the US health system. Bravery beads rewards children who are terminally ill with different beads for different tests and treatments which they add to strings which sort of map where they have been and what they have gone through. Most of these beads are commercially available ones donated by larger businesses, but they also like to have some "specials" for special occasions which are made by lampworkers like myself. Quite a lot of the aussie lampwork community have supported the program by making some standard sets which are given to each child on the program and myself and others have also made some regional beads which are given to the children to identify which hospital they are based at. Here is one of the beads I made for a hospital on the north coast of NSW, the unit was called the Possum Unit so thats what I did!

I got my finger out recently and made a few other beads to send in. One of the most popular ones that I have come up with was my X-ray bead. I actually made some white skull murrini to apply to them as well and I reckon they have come up even better now using this. Bravery Beads told me that these x-ray beads were treated like "gold nuggets" at the hospital and could I please send some more.........OF COURSE!!!!!!

I made some "people" beads too which are small but fairly sturdy (we can't have a bead breaking on a sick little kid!) and these were quite fun to make. I am determined to make some more each time I torch!
There are always a few extras to send along too, now I need to make some more dogs heads for the PET scan etc.! I have been trying to make at least one bead for Bravery Beads program each time I sit at the torch, but slackened off a bit. Now to make up for my laziness, I am determined to make at least 3 each time I sit at the torch and send a parcel once a month!!!!!

Monday, April 5, 2010

Putting a smile on your dial

Yesterday I was having a big think about how to get a cute smile on a small bead and had a quick look through some of my collection of ex-dental tools. In there was a sort of scoopy one, so I showed it to Leo and he ground it back half way for me and viola....... a smile maker.

I have been particularly guilty about my slack efforts for the bravery beads program lately (have not been keeping up at all with my once per month parcel of beads..... its been nearly 6 months) so I thought I would use the newly created smile imprinter to make a few "people" beads. It worked fantastically!

After making quite a lot of Bravery Beads I felt inspired to see what else I could do, so I made a torso to match the head. The glass moved in mysterious ways and produced to me what looked suspiciously like a bridal gown:


After making the bridal gown I thought I should make a bride's head to match and this is what came out:


Then the next project, pretty lady goes to the races in 19th Century (don't even ask where this came out of my brain, sometimes I even scare myself) and this was the result. I was getting a bit Frustrated with not having canes premade so she was a put thrown together colour wise, but I have made a few colourful ribbon canes for my next efforts today.


I did have fun making the hat though!

Buggered if I know what anyone would use them for, Leo suggested I make a groom as well, like cake toppers. I am thinking a pirate might be much more fun!!!!

Saturday, April 3, 2010

Murrini Fest - addicted to making murrini ;-)

Yep, I have always been fascinated with murrini.... always!

For those who do not know what murrini are, it is where you construct a picture in glass then heat and stretch out into a cane. When you slice the cane there is the picture in each slice and you can insert these into your other glass creations - like little tiny works of art! For anyone who has had the hard candy that has a picture in it or fancy sushi then you have a good idea of how its done.

I started making myself some murrini when I had only been lampworking for 6 months eventually I graduated to making complex face canes and feeling rather pleased with myself until I did the Loren Stump course last year and learnt how to do it so much more easily and with better results. Its a bit embarassing to look back at the early attempts now and to think of the dodgy pulled where I ended up with a thick stringer between two dogbones of glass!

I have been making lots of aquarium or ocean related murrini over the past 12 months and last night made some black tip reef sharks and some leafy sea dragons too. I am still in the mood for making some multiple pull complex cane murrini, but have yet to decide what I want to do (I have made toy police cars, swimming frogs etc. before but want something brightly coloured and interesting).

I have also decided to write up a fairly comphensive tutorial on different ways of using murrini - this is not going to be an item that I sell or anything (I wouldn't be so presumptuous) but loads of people ask how to use them and it would be easier to have something written with some pics! I might have to see if some lampy friends could proof read it for me and try it out to see how clear I have been.

Easter Saturday and the house is empty - three girls gone shopping with Dad......YAY!!!!

Friday, April 2, 2010

Pink Bling floral necklace - sparklefest on chain!

Ask anyone who knows me - I am not a pink frilly/fluffy sort of girl at all.... Yet, this necklace was a concept piece that turned out very sparkly and just a little bit pink!!!!

I used the bellflower press and some clear boro glass and bent each petal ridge out to give the impression of an open flower. After making the clear ones, I was thinking about just a hint of pink with clear around the edge, but I was a litle bit heavy handed on the pink compared to what I had planned - still it came out fairly nicely anyway!

I love the clarity of the clear boro on this, but felt like the sparkliness was a bit over the top with the swarovski crystals, Czech crystal balls and Miyuki clear ab cubes...... bit jarring to the eyeballs, but would be nice for a formal evening when something blingy is the thing you want!

I am thinking of making some sets of the flowers to list in my Etsy....hhmmmmm, but the laziness may kick in first!

I had a dream last night about a macaw murrini....... I am feeling very like making some murrini right now - I will post up some results in the next few days!

Monday, March 29, 2010

Bellflower press fest!

Ok, I got my Carlo Dona bellflower press months ago and did not last a day before using it...... every short rod of glass on my lampworking desk was at serious risk.... I made HUNDREDS of the little buggers and got a real nice feel for how much glass to put onto the headpin. I have used loads of the bellflowers on my Sydney Royal Easter Show entry - along with 5 horseheads on a necklace.... busy is not an adequate word, but the lampies do look good. Even after using lots of these flowers I was still left with heaps of them. Given that, particularly in the beginning, I was mostly just practicing - they are in lots of different colours so I thought, bugger it..... lets make something gardenish and greenish and this is what came out (sorry about the bodgy inside with the flash on pic). I used chain, attached the bellflowers with wire wrapping then sewed the seed beads through the chain using fireline. The good thing about using chain this way is that the whole necklace stays sort of nice and floppy but still full of beads!

When I was making these flowers my Mum had come for a visit from Canberra and she asked to watch...... thankfully I said yes of course, because she made a whole stack of really great suggestions like - pull each ridge into a petal and add stamens etc. It was excellent and I was no longer producing the plain and simple variety which made it much more interesting, lucky the old chook is really into gardening.

The next question was, how does boro work doing this? Boro works GREAT!
This second necklace was made using boro bellflowers with stamens in pink with orange frit and green multicolour striped momka glass rod which I cut up like murrini and applied carefully to the headpin so I maintained the stripes. I kept this necklace a bit more muted in colour and is very sort of gentle and soft both in colour and feel. I used some silver balls for a bit of bling rather than swarovski crystals and was very pleased with the result.
Right at this moment I have about 30 more flowers annealing overnight in my kiln. Half are just clear boro which should come out lovely and sparkly and the other half also in clear but with a soft pink flower base. I am thinking that I will make a necklace and bracelet set out of these using all clear ab seeds, clear swarovski crystals and perhaps just a few pink lined seeds or I might go for the silver balls again....... I will have to see how it all looks together.
It'll be one of those morning when I get up about 6am and run out the kiln..........

Sunday, March 28, 2010

Plug yer ears - its boro time!

Hmmmmm, well I have seen some really cool earplugs lately - NO, not the type that stops you from hearing, but the type that people put into those huge earlobe holes that are all the trend. I have been busting to make some nice ones with murrini in the end so here are a couple for your viewing pleasure. One has a bee murrini that I made with wings so thin you can't see them (thank god I did only one small pull of this cane) and the other one I put a little clownfish murrini inside and it looks quite good. Please excuse the fluff on the glass in the pic, I am far to lazy today (Sunday morning) to bother to take another.
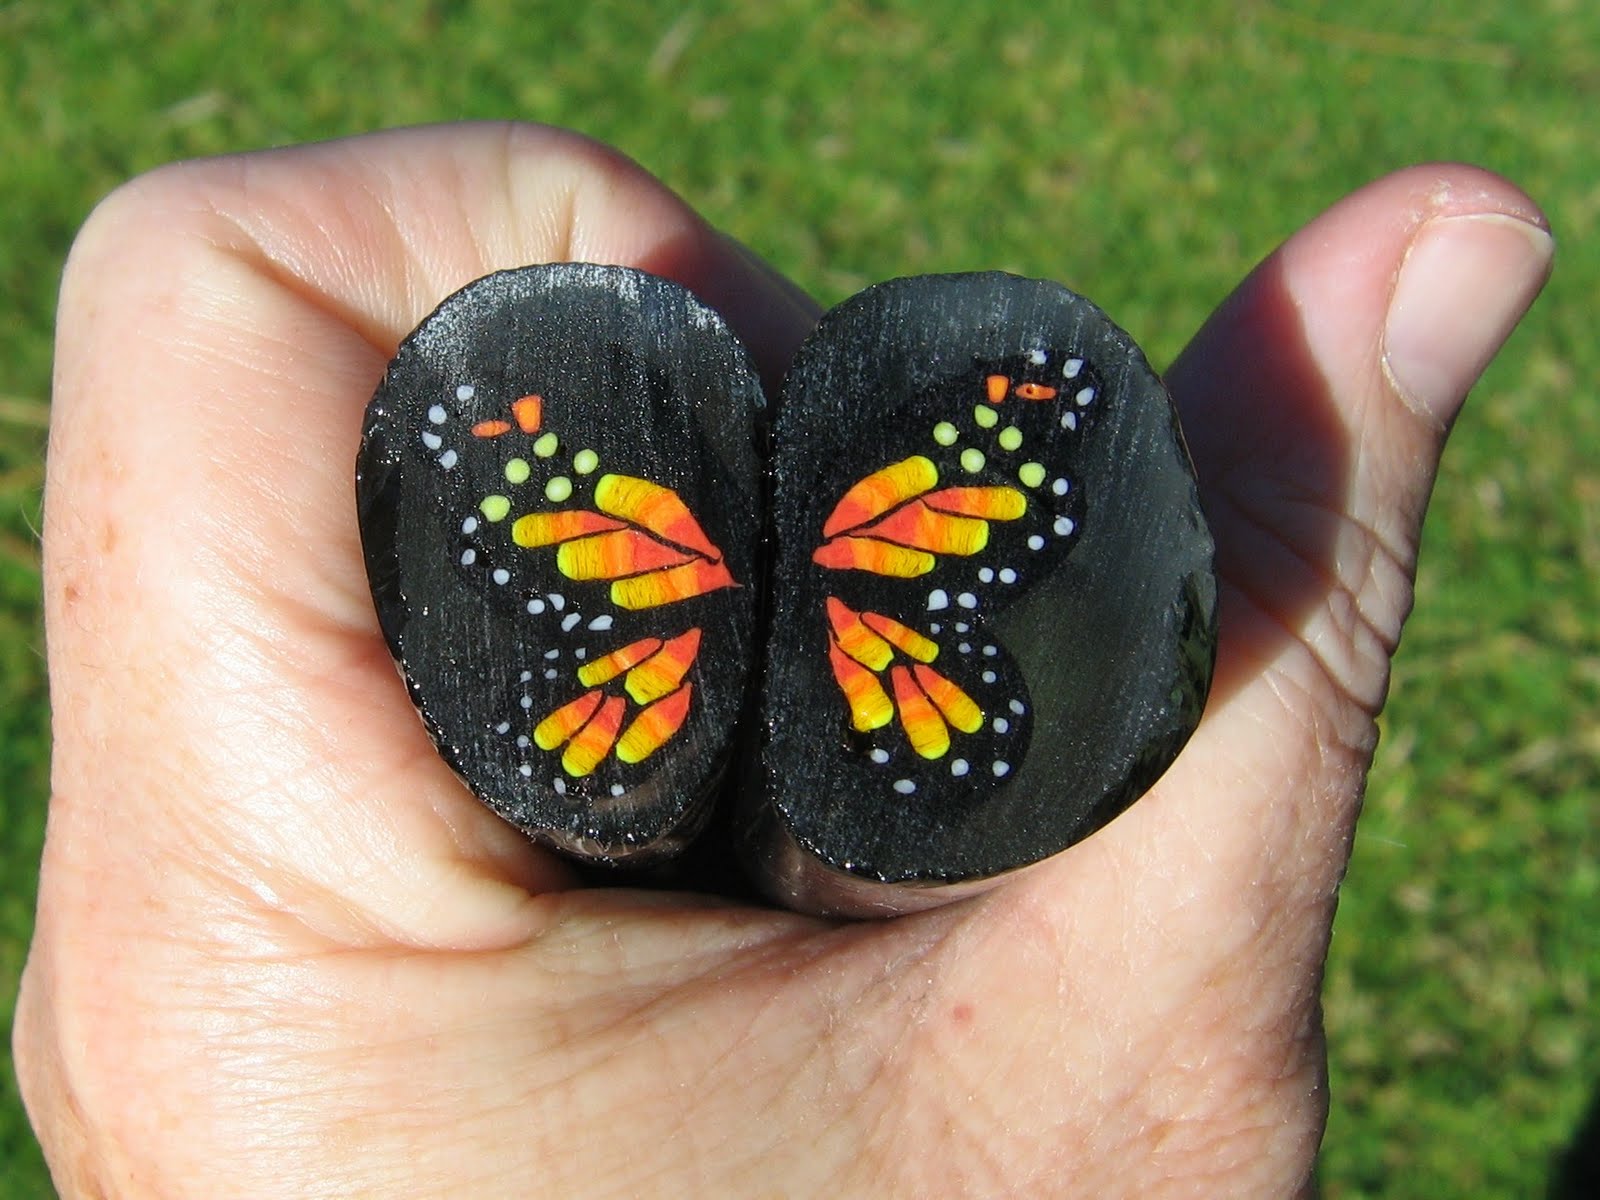
I am thinking that I might send out the call to my facebook mates for a tester for these. I do need to get hold of some decent calipers so I can accurately measure the middle part before I try selling them, but I am hopefull that they should work ok. I am going to go and see a couple of the local body peircing shops to see if they would stock on commission for me too - they are a bit fiddly, but use only a small volume of glass and you get quicker the more you make too. I like that they are in boro, but I might make some soft glass ones too - mostly because I have a gozillion different murrini I have made for soft glass and would like to make more use of them.

I am thinking that I could easily make some of those earhole stretching thingo (like a long tapered cone or a long cone that is curled up). Lots of possibilities and loads of fun to be had I'd say!

Saturday, March 27, 2010

Happy Easter - the beads are breeding like rabbits!

Well, I have been thinking about Easter and the chocolate madness that always seems to ensure in my household. It is really the one day of the year where the girls all seem to manage to eat nothing but chocolate, there is sore tummies and whinging every time - but the memory is lost by the following year. I have tried NOT buying chocolate eggs ...... but then the rest of the family feels sorry for the poor things and over-compensate anyway.

I decided the the gift from Mum would be glass easter bunny pendants that I made. Leo will be in charge of the eggs, but it is a longer lasting, less sick-inducing gift that I will be giving them. Rose loves purple, Emma is definitely a "pink" girl and Grace usually likes black, but I made her one in white. I made myself one in caramel. These are all done using boro glass for a bit of extra strength and when I showed Leo what came out of the kiln this morning he reckons I should make some to sell and make some real tiny ones for on earrings. Once again I have missed the boat with timings though, Easter is only about a week away....... POOP.

Oh, you will see that I boiled the buggery out of the purple, so I am going to have to make another one for Rose.

Friday, March 26, 2010

Woah, lets bring out some bling!

I went shopping for glass recently and did a wee little bit of impulse buying (I told my hubby Leo I didn't buy much ;-) and bought some interesting garnishes of dichroic frit and some dichroic chatons to try out. I bought them from a newish glass company in the US who specialise in affordable inexpensive glass called Devardi. There has been a veritable shitfight on the Lampwork Etc forum about the evils of shocky rods and other more emotive reasons for not buying this glass, but I have to say - yep, some colours are shocky, but the glass is actually quite lovely to use once you get used to how to handle it. Its one of those glasses that you need to work cool and slow - perfect for the hothead if I still used one. One of the new products they have stocked is dichro (this has also been fairly well slammed by the purists) but whilst I am no experienced expert or anything, I have got it to work at least a bit. The fish above is encased chatons which were very easy to use, but admittedly were a little sensitive to direct heat. I liked how they came out looking somewhat like fish scales and will use this again sometime to make some nicer shaped fish in future.

The other garnish that I REALLY like is the dichro frit. I bought the dichro on black and found that if I used the tweezers and turned the bigger bits shiny side down before rolling my bead I would get a lot more bling out of it. I didn't take too much care with the heat or the shaping, but really do like the effect and ended up showing them to a customer who promptly ordered a necklace out of them.... so already sold - gotta be happy with that!
I also bought some of the dichro noodles which I am going to give a try out in the next few weeks.
My next project is a little something for the girls for easter........ think...... rabbit pendants!!!!!